Downloading a Completed Report
Once a form has been submitted or manually resolved, it will appear immediately on the Reports tab of your Admin Dashboard. By default, reports are sorted by submission date and time.
To download a report, locate the one you wish to access, click the Actions icon (three dots in a circle), and select Download Report + Media. This will download the PDF report along with any media files captured or uploaded for that incident—whether added by a patroller during form entry or by an administrator after submission.
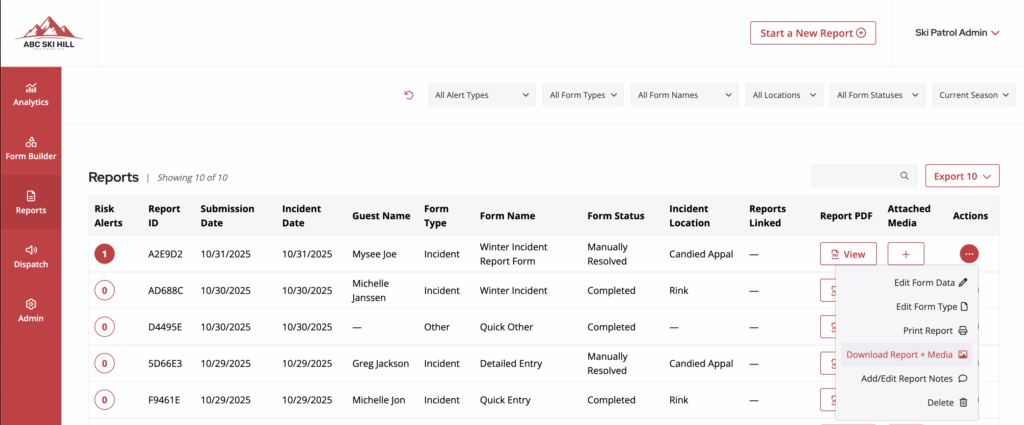
If you prefer to print the report directly, click Print Report to open the PDF in your system’s print dialog.
Modifying Submitted Form Data
Once a form has been submitted, a patroller no longer has access to edit or modify any form fields. However, users with Reporting or Admin access can make changes if needed.
To modify a submitted form, navigate to Admin Dashboard > Reports. Locate the report you wish to edit, click the Actions dropdown for that report, and select Edit Form Data.
This will open the form in edit mode, allowing authorized users to make updates and save changes.

Uploading Media Attachments to Reports
zPatrol supports attaching audio, video, PDF, and image files to any report. Uploaded media appears in a list at the end of the report PDF, including a thumbnail (if available), the uploader’s name, and a timestamp. Media can be added either from the Admin Reports dashboard or directly within a form during entry.
To upload media from the Admin Reports dashboard:
- Navigate to Admin Dashboard > Reports.
- Locate the report you want to upload media to.
- Click the plus icon in the Media column (or the image icon if media has already been uploaded).
- Select the files you wish to upload when prompted.
- Click Upload Media in the modal if you want to add more files.
- When finished, click Save.


To upload images from within a report:
An administrator must first enable this option by adding an Image Upload field to the form in the Form Builder.
- Navigate to Admin Dashboard > Form Builder.
- Locate the form you want to update.
- Drag and drop the Photo field onto the form.
- When patrollers open this form during entry, they will see a large button prompting them to take a photo using their device camera.
- Once submitted, the photo automatically appears as a media attachment in the Media column on the Admin Reports dashboard.
Note: Images uploaded from within a form can only be edited or deleted from within that same form. To do so, go to Admin Dashboard > Reports, click the Actions icon next to the report, and select Edit Form Data. From there, you can modify or remove the image.
Linking Other/Supplemental Reports to Incident Reports
If a supplemental (Other) report is related to an original Incident report (for example, a witness statement), you can link them together to create a complete incident investigation package. Only supplemental reports can be linked to incidents—you cannot link one incident report to another. Linking reports allows administrators to export a full incident package that includes all related reports and any attached media.
To link reports from the Admin Reports dashboard:
- Navigate to Admin Dashboard > Reports.
- Locate the supplemental report you want to link to an incident.
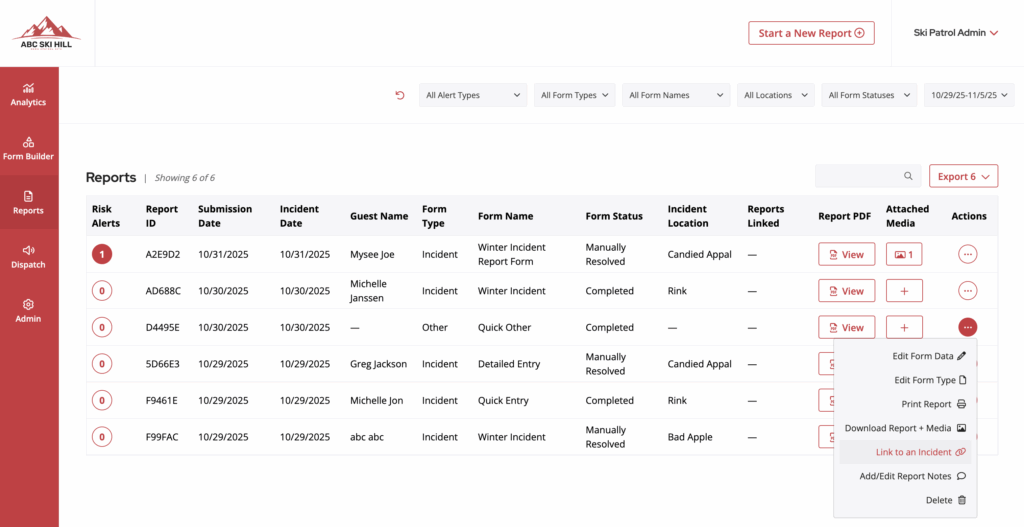
- Click the Actions icon (three dots in a circle) next to that report.
- Select Link to an Incident.
- In the modal, search for the incident by Report ID, Guest Name, or Incident Date.
- Select the incident you want to link to, then click Save.


To link reports during form entry:
An administrator must first enable this option by adding a Report Link field to the supplemental form in the Form Builder.
- Navigate to Admin Dashboard > Form Builder.
- Locate the supplemental form you want to update.
- Drag and drop the Report Link field onto the form.
- When patrollers open this form during entry, they will see a large button prompting them to search for a submitted incident report to link to. (Only submitted reports will appear; reports still In Progress cannot be linked.)
- Once submitted, the link automatically appears on the Admin Reports dashboard.
To unlink reports:
- Navigate to the supplemental report that contains the report link.
- Click the Actions icon and select Edit Report Link.
- Click Remove Link to disconnect the report from the incident.
Downloading an Incident Package
Administrators can export a full incident report package that includes all incident and other (supplemental) PDF reports that were linked to the original incident. It will also include all media, in full resolution, that was linked to each report included in the package download.
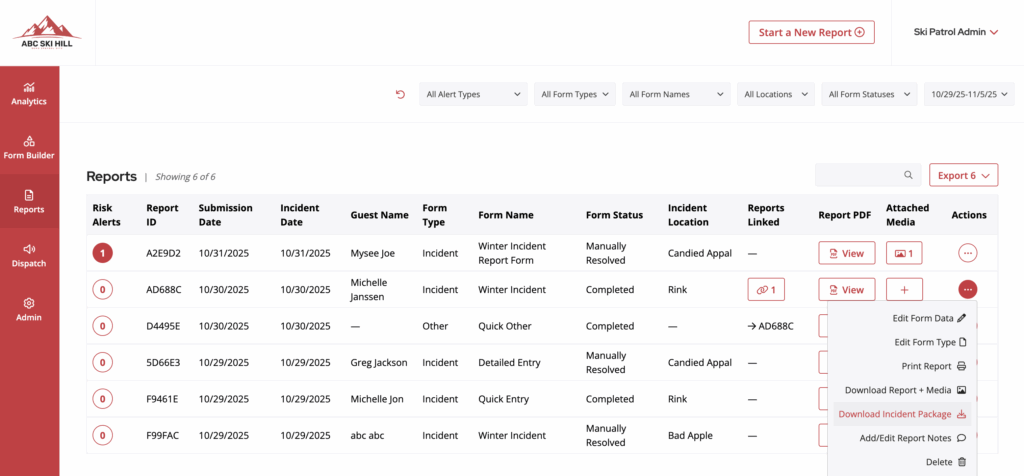
How to download an incident package:
- Navigate to Admin Dashboard > Reports.
- Locate the incident report you want to download an incident package for
- Click the Actions icon (three dots in a circle) next to that report.
- Select Download Incident Package
Bulk Report Exports
- Navigate to Admin Dashboard > Reports.
- Apply any filters you want to use to refine which reports appear in view.
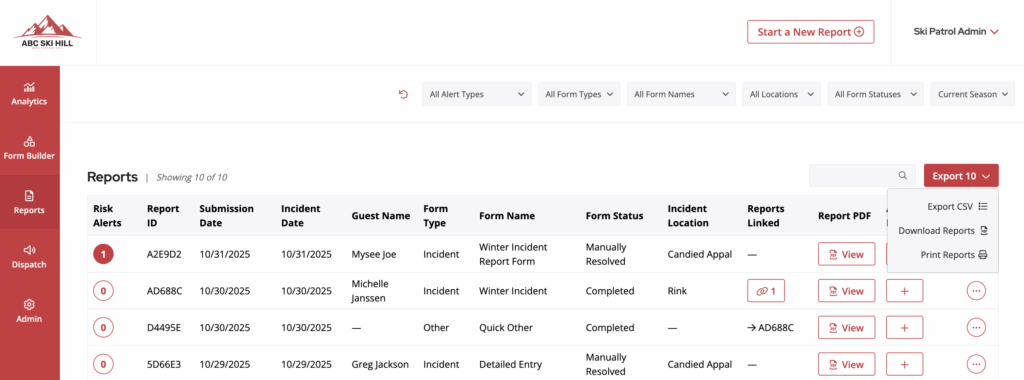
- Click the Export button in the top-right corner of the reports table. This will export only the reports currently visible on your screen, based on your selected filters.
- Choose one of the available export options:
-
- CSV Export: Exports a CSV file containing any shared or mapped data fields that are common across multiple reports. Each report displays as a single row in this bulk export.
- Download Reports: Downloads a folder containing all PDF reports (without media attachments) to your downloads folder.
- Print Reports: Combines all PDF reports into a single PDF file and opens your print dialog, allowing you to print multiple reports at once.